- raise the rear of the car so that the wheels are off the ground and place on supports;
- make sure that the friction of the brake pads of the rear brake mechanisms begins after lifting the parking brake lever to 2 clicks;
- make sure that the parking brake lever travel does not exceed 8 clicks.
If the control showed incorrect results, you must do the following:
- check how the cables are laid along the track;
- make sure that the cables are not pinched anywhere;
- make sure that all parts and assemblies of the parking brake drive are free to move in both directions;
- adjust the parking brake actuator.
Adjust the parking brake drive in the following order:
- raise the rear of the car so that the wheels are off the ground and place on supports;
Attention! When carrying out work on adjusting the parking brake drive, there should be no air in the hydraulic drive of the brake system.

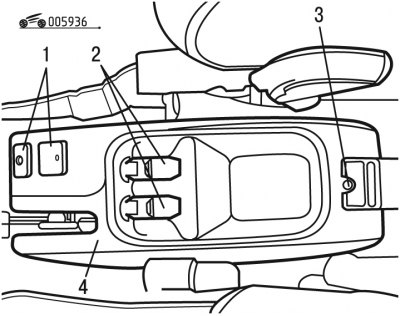
Pic. 9.36. Removing the rear center console: 1, 2 - connectors; 3 - bolt; 4 - console
- to get to the parking brake equalizer, remove the rear part of the center console 4 (pic. 9.36), by disconnecting connectors 1 and 2 and unscrewing bolt 3;

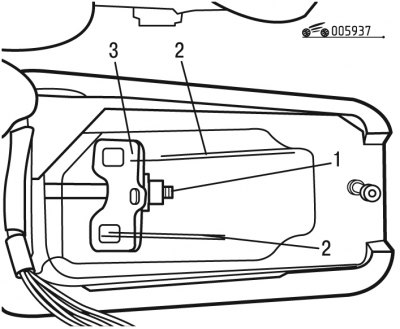
Pic. 9.37. Parking brake actuator adjustment: 1 - nut; 2 - cables; 3 - equalizer
- loosen the tension of the cables by unscrewing the nut 1 (pic. 9.37) equalizer mounts 3;
- fully lower the parking brake lever;
- with the engine running, press the brake pedal 40 times;
- lightly tighten nut 1 and raise and lower the parking brake lever about 10 times;
- set the parking brake lever to the 2-click position, starting from the bottom;
- tighten hook 1 until the brake pads begin to brake the wheels at this position of the lever;
- make sure that the parking brake lever stroke does not exceed 8 clicks;
- make sure that both ropes 2 on equalizer 3 move at the same time;
- make sure that the wheels turn freely when the parking brake lever is released;
- check that the parking brake warning light illuminates when the lever is raised to the 1-click position.
