- remove the gearbox from the engine;

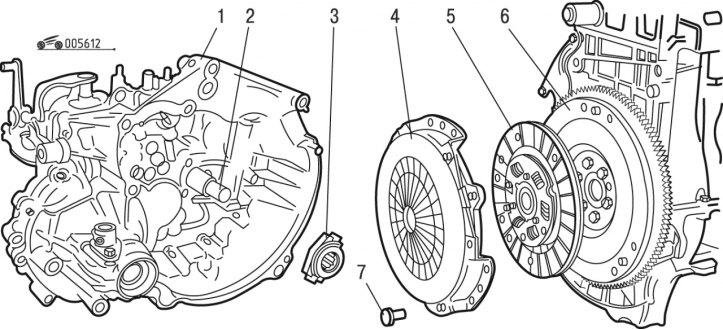
Pic. 6.12. Clutch details: 1 - gearbox; 2 - input shaft; 3 - clutch release bearing; 4 - casing with pressure plate; 5 - driven disk; 6 - flywheel; 7 - bolt
- mark the position of the pressure plate casing relative to the flywheel 6 (pic. 6.12);
- gradually, crosswise, unscrew the bolts 7 securing the casing to the flywheel and remove it together with the driven disk.
Check the technical condition of the clutch parts in the following order:
- check the condition of the clutch pressure plate;
- check the wear on the ends of the diaphragm spring;
- check the pressure plate for cracks, burn marks and surface wear;
- check the flatness of the pressure plate;
- check the thickness of the lining of the clutch disc;
- check the condition of the friction surface of the flywheel for cracks, burns and surface wear;
- check the condition of the starter gear;
- check the absence of traces of oil in the installation area of the crankshaft oil seal and gearbox;
- check the condition of the clutch release bearing.
Install the clutch in the following order:
- attach the clutch disc to the flywheel, while orienting it as it was before removal;
- Install the clutch pressure plate to the flywheel. When reinstalling a previously removed clutch disc, check that the marks applied before removal are aligned;
- using a special mandrel or an old gearbox input shaft, center the clutch disc relative to the flywheel;
- step by step, diagonally tighten the clutch pressure plate mounting bolts to 15 Nm. Remove the mandrel from the clutch disc;
- make sure that the gearbox input shaft splines and bearing guide bushing are free of dirt. Grease should not be applied to the input shaft splines;
- apply a thin layer of Molykote BR PLUS grease to the clutch release bearing;
- install the clutch release bearing on the sleeve;
- install the gearbox.
