- remove the door trim;
- remove the dust and moisture protective film covering the inside of the rear door;

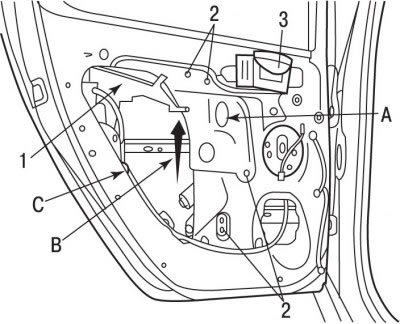
Pic. 9.46. Rear window mount: 1 - thrust; 2 - rivets; 3 - internal door opening handle; A - holes through which the glass fastening bolts are turned out; B - the direction of removal of the power window; C - hole in the door for removing the power window
- raise the glass until the glass fixing bolt appears in hole A (pic. 9.46) on the inner panel of the door;
- disconnect the wire «masses» from the storage battery;
- through the holes in the door, unscrew the two bolts securing the glass to the power window;
- lift the glass up to the stop with your hands and secure it in this position with adhesive tape;
- lower the window regulator to its lowest position;
- remove the inner door opening handle;
- release the rod 1 from the clamps;
- with a 10 mm drill, drill out 2 rivets (see fig. 9.46) fixing the power window to the door;
- move the power window mechanism up in the direction of arrow B, then inside the door;
- remove the power window through hole C in the back of the door;
- drill out the remaining parts of the rivets from the power window;
- blow through the inside of the door to remove chips after drilling the rivets.
Installation is carried out in the reverse order of removal, taking into account the following:
- when installing rivets, take measures to protect the door;
- fix the dust and moisture protective film, which must be installed without wrinkles or tears;
- the surface on which the dust and moisture protective film is glued must be perfectly clean;
- connect wire «masses» to the battery;
- check the operation of the power window;
- initiate all electronic systems.
