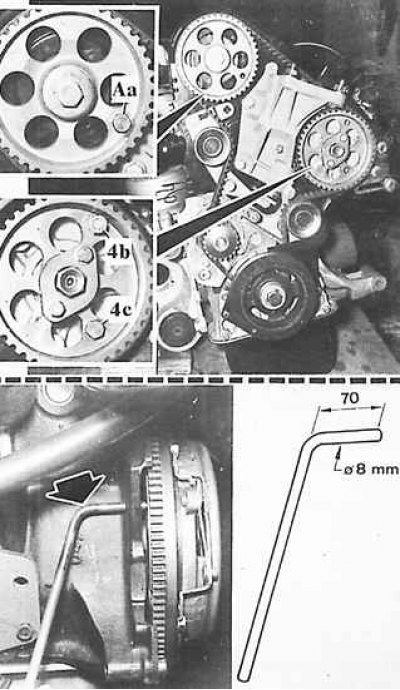
The method of fixing the elements of the camshaft drive

Aa - camshaft fixing screw,
4b, 4c - screws fixing the high pressure fuel pump shaft
At the bottom of the figure - a way to fix the flywheel with a locking rod (indicated by an arrow) and rod dimensions.
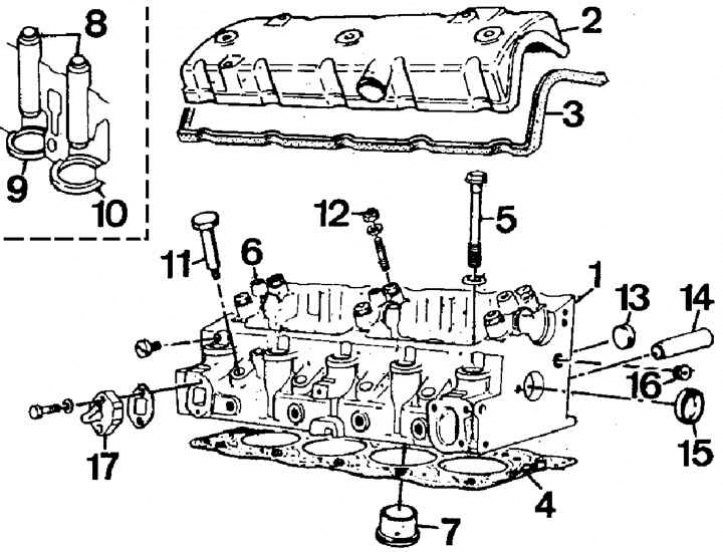
Cylinder head

1 - cylinder head, 2 - cylinder head cover, 3 - seal, 4 - cylinder head gasket, 5 - cylinder head bolt, 6 - camshaft bearing cap, 7 - swirl chamber, 8 - valve guides, 9 - outlet valve seat, 10 - inlet valve seat, 11 - element for checking TDC, 12 - camshaft bearing cap nut, 13 - plug with a diameter of 27 mm, 14 - tip of the heating system, 15 - plug with a diameter of 32 mm, 16 - tip with thread, 17 - plate with a tip of the fuel heating system
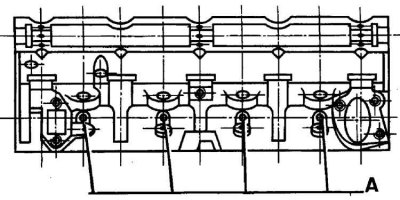
Identification of cylinder heads equipped with new valve seats

A - holes in the new type of heads with a diameter of 9 mm (instead of holes with a diameter of 7 mm)
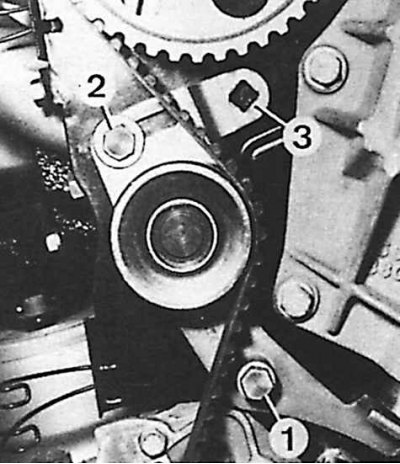
Timing belt tensioner adjustment

1 - axial screw,
2 - fastening screw,
3 - square 3/8"
1. Check if the engine parts are correctly positioned (see fig. The method of fixing the elements of the camshaft drive).
Attention! You can not rotate the camshaft without checking if the pistons are in the middle of their stroke, and during the rotation of the crankshaft it is necessary to monitor the position of the valves.
2. Install the belt.
3. Loosen the belt tensioner bolts, and then tighten them when the tensioner tensions the belt.
4. Remove blocking elements (3 screws and metal rod).
5. Turn the engine crankshaft two turns and reinstall the blocking elements.
6. Adjust the position of the belt if necessary.
7. Loosen and then tighten the idler roller bolts.
8. Use a metal rod to block the flywheel.
9. Install the bottom plastic cover.
10. Install the belt pulley (before that, coat the thread with a few drops of a special agent "Loctite", that prevents unscrewing).
11. Screw in the bolt with a torque of 40 Nm, and then tighten it by an angle of 60°.
12. Remove the metal rod blocking the engine flywheel and install the lower plate of the clutch housing.
13. Install the middle latch on the front plastic cover. Attach the front plastic cover.
14. Install the plastic support element.
15. Install both sides of the camshaft housing, insert the three latches and push the latches with a large screwdriver (Please note that the rubber support element must be inserted before installation).
16. Put on the alternator drive belt, tighten it and screw the fasteners.
17. Install the right engine mount.
18. Remove the elements supporting the engine.
19. From under the right wing, install the right casing.
20. Install the glow plugs and, on XUD 7TE engines, the air pipe between the filter and the turbocharger.
21. Connect ground wire to battery.
