Installation of a gas distribution system

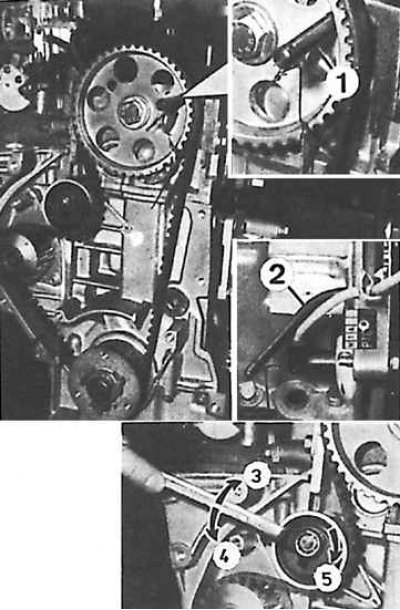
1 - setting rod for fixing the camshaft, 2 - setting rod for fixing the crankshaft, 3 - tightening the tension roller, 4 - unscrewing the tension roller, 5 - direction of eccentric rotation of the roller
Toothed belt tension adjustment

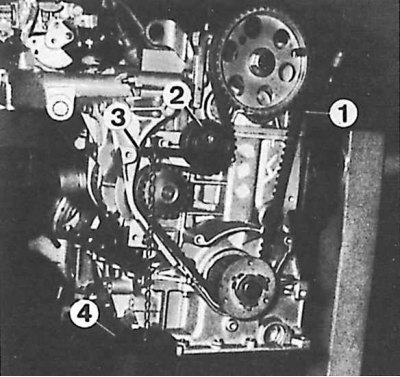
1 - toothed belt, 2 - tension roller, 3 - Peugeot special tool, 4 - weight 1.5 kg
1. Degrease the connecting surface of the cylinder block and head with the cylinder head gasket.
2. Rotate the engine crankshaft to a position where a 6 mm dowel rod can be inserted into the flywheel and the crankshaft can be fixed.
3. Remove two special Peugeot plates (tool 0132 A1Z) fastening the cylinder liner by unscrewing their fastening bolts.
4. Install a new cylinder head gasket on the upper surface of the cylinder block and install the head itself on it.
5. Insert the locating pin into the camshaft pulley blocking hole and fix the camshaft by turning it accordingly.
6. Install on the cylinder head all five brackets of the valve lever shaft with levers and their axis, paying attention to the correct installation of the intermediate fingers of each bracket of the valve lever shaft in their holes in the cylinder head.
7. Lightly coat the threads of the cylinder head bolts with Molykote G Rapi12 Plus. Screw in these bolts first by hand and then tighten them in two stages: first to a torque of 20 Nm and then to an angle of 240°, in order from the middle outward, moving in a spiral.
8. Check that the camshaft and crankshaft are correctly installed.
9. Fit the toothed belt first on the crankshaft pulley and then on the camshaft pulley. Tension the toothed belt with a slight force using a tension roller.
10. Remove the camshaft and crankshaft locating pins, and insert the Peugeot special tool into the tensioner roller (fixture 0132 X) for tensioning the toothed belt, or a suitably fitted 10 cm long rod forming a one-way lever with a 1.5 kg weight hanging at the end of the lever arm.
11. Loosen toothed belt tensioner bolt and tighten to 23 Nm.
12. Tighten camshaft pulley to 80 Nm (if previously removed).
13. Slowly turn the crankshaft in the direction of working rotation two turns by turning the crankshaft pulley bolt, and then fix the flywheel with the dowel pin.
14. Loosen the idler pulley bolt and lightly press the belt so that the pulley turns. In this position, the camshaft locating pin must not be inserted.
15. Tighten the idler pulley bolt to 23 Nm, remove the adjusting rod from the flywheel, slowly turn the crankshaft again in the direction of working rotation two turns and fix the flywheel again with the adjusting rod.
16. Slowly loosen the tensioner pulley bolt so that the weight of the tool tensions the toothed belt, then tighten the idler pulley bolt to 23 Nm and check that the camshaft locating pin can be inserted in this position. If so, remove both locating rods (camshaft and crankshaft).
17. Use a feeler gauge to adjust valve clearances.
18. Install three-piece toothed belt guard and tighten bolts to 6 Nm.
19. Insert the sheet casing into the cylinder head (oil reflector) and two spacers, as well as install a new valve cover gasket and the cover itself, tightening the mounting bolts to a torque of 16 Nm.
20. Perform the rest of the steps in reverse order with respect to the removal process, and fill in oil and coolant, as well as adjust the carburetor control rods.
