Attention! Mark with chalk, marker or paint the direction of travel of the timing belt if it is to be reinstalled. Failure to follow the previous course of the toothed belt during its further operation leads to its damage or rupture.
1. Disconnect the wire terminal «masses» (-) from the negative pole of the battery.
2. Move the expansion tank of the power steering away from the place of work.
3. Remove the power steering pump drive belt.
4. Remove the alternator drive belt.
5. Remove the spark plugs.
6. Remove the front right wheel.
7. Remove engine protection.
8. Turn the engine by the belt pulley bolt on the crankshaft and align hole 1 on the pulley with the hole on the timing cover so that you can insert the stop and lock the crankshaft (see illustration). After installing the stop, the pistons are located approximately in the center of the cylinder channels.
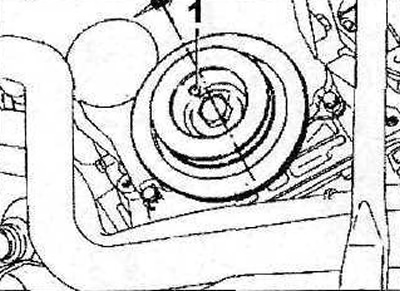
2.8 Insert a stop into hole 1 and lock the crankshaft
9. Remove clutch, see relevant chapter.
10. Lock the flywheel with a suitable stop shoe OR stop FACOM D86 (see illustration).
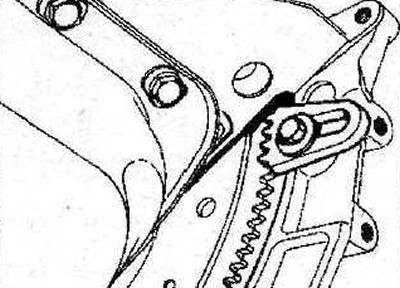
2.10 Lock the flywheel with a suitable stop shoe or stop FACOM D86
11. Remove the top part 2 of the timing cover (see arrow in illustration).
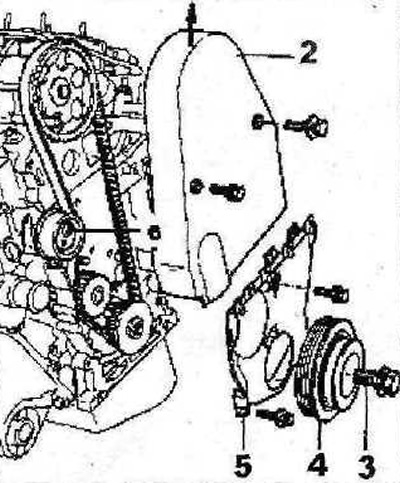
2.11 Remove the top part 2 of the timing cover (see arrow)
12. Unscrew the central bolt 3 fastening the belt pulley 4 and remove the pulley from the crankshaft (see illustration 2.11).
13. Remove the oil pan 5 (see illustration 2.11).
14. Remove the stop shoe that was used to block the flywheel.
15. Loosen the bolt 6 fastening the tension roller (see illustration 2.11). Then turn the tension roller in the direction of the arrow (see illustration 2.11) to loosen the belt tension.
16. Carefully remove the timing belt.
Vehicles with XU10J4R engine
17. Remove the front right wheel and fender liner.
18. Remove the accessory drive belt.
19. Move away from the place of work the harness 1 of the engine wires (see illustration).
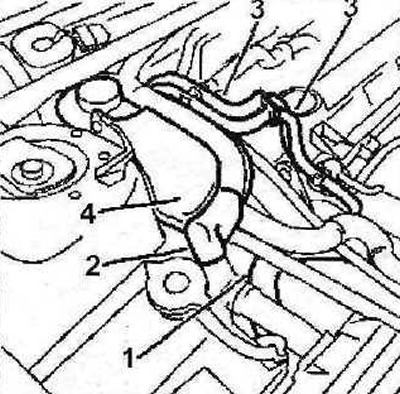
2.19 Move harness 1 of the engine wires away from the place of work. Vehicles with ABS
20. Cars with ABS. Move the fuel lines 3 away from the place of work (see illustration 2.19).
21. Move the expansion tank 4 of the power steering away from the place of work (see illustration 2.19)
22. Install a support beam on the front end to raise the engine and unload the power block supports, or lift the engine with a crane by hooking it «A» behind the eye (see illustration).
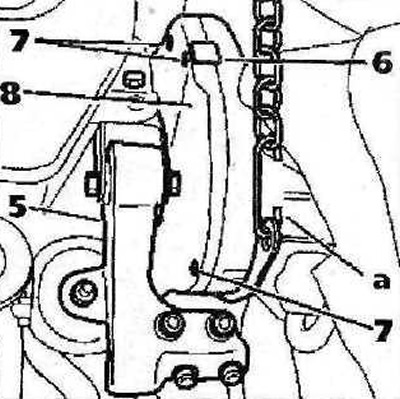
2.22 Lift the engine with a crane by hooking it «A» behind the eye
23. Remove support 5 engine mounts (see illustration 2.22).
24. Release latch 6 (see illustration 2.22).
25. Unscrew the bolts 7 and remove the protective cover 8 of the timing gear drive by pushing it up (see illustration 2.22).
26. Lock the crankshaft by inserting a suitable thrust roller or, for example, a stop «A» 0153-G, in the appropriate hole (see illustration).
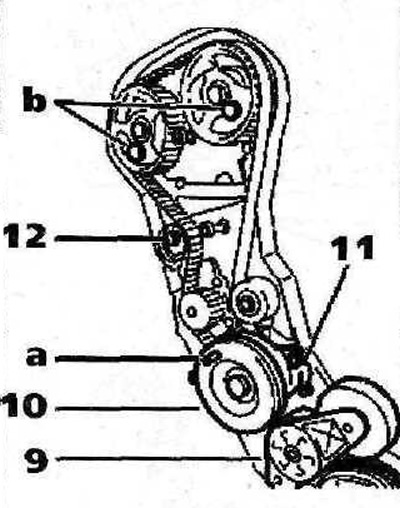
2.26 Lock the crankshaft by inserting a stop «A» 0153-G, in the appropriate hole
27. Lock the camshaft gears by inserting suitable thrust rollers or, for example, stops «b» 0153-AB into the corresponding gear holes (see illustration 2.26).
28. Remove the belt pulley 10 from the crankshaft (see illustration 2.26).
29. Remove the protective cover 11 (see illustration 2.26).
30. Remove the stop shoe that was used to block the flywheel.
31. Loosen the bolt 12 of the tension roller and move the roller away from the toothed belt to loosen its tension (see illustration 2.26).
32. Carefully remove the timing belt.
Attention! The toothed belt must not be kinked, twisted or rolled up. A dirty, damaged or worn belt must be replaced.
