The crankshaft is sealed at both ends with oil seals.
Before removing the crankshaft, it is necessary to measure the amount of its axial displacement in order to prepare in advance the thrust half rings of an increased repair size. We recommend having the crankshaft journals refinished by a suitable workshop.
The procedure for installing the crankshaft is given in chapter «Engine - assembly». Particular attention when installing the crankshaft should be paid to the correct position of the liners with oil grooves and without grooves, but with oil holes. Thrust half rings must be installed with the same repair size (one thickness).
Rear crankshaft oil seal - replacement
The crankshaft oil seal on the flywheel side can only be replaced with the flywheel removed. Crankshaft oil seal wear is manifested in clutch slippage, due to the fact that the oil seal passes oil into the clutch from the crankcase. A new seal must be ordered.
1. Remove the oil seal with a screwdriver from the crankcase. Be careful not to damage the crankcase or crankcase flange. To facilitate the work, two self-tapping screws can be screwed on both sides of the stuffing box, and then, prying them alternately at the heads, remove the stuffing box.
Check the surface of the crankshaft mating with the seal lip. If, as a result of friction, signs of wear are visible on the surface, then a new oil seal will need to be installed a little deeper into the crankcase.
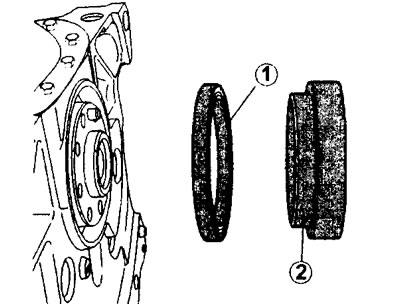
2. Press a new oil seal with a suitable mandrel into the crankcase (see illustration).

12.2 Press new oil seal 1 with a suitable drift 2 into the crankcase
Lubricate the outer and running surface of the oil seal with multipurpose grease. If the surface of the crankshaft on which the oil seal stands is normal, then press the oil seal flush with the surface of the cylinder block. Otherwise, press the stuffing box deeper into the crankcase and make sure that the stuffing box fits snugly over the entire surface.
Front crankshaft oil seal - replacement
The front oil seal is located behind the crankshaft timing gear or in the drive cover (XU10 engines). This seal can be removed without removing the engine from the vehicle. To replace the oil seal, the toothed belt must be removed. When purchasing a new oil seal, you must specify the engine number.
The procedure for extracting the stuffing box is quite laborious, since it is located in the recess of the crankcase of the crank mechanism. It is possible to screw in two self-tapping screws on both sides of the oil seal, and then remove the oil seal, proceeding in the same way as when removing the rear oil seal. In order to remove the oil seal from a dismantled or standing on the car engine, do the following.
3. Loosen the tension roller and remove the alternator drive belt.
4. Turn out bolts of fastening of a pulley of a driving belt on a cranked shaft and remove a pulley.
5. Turn out a bolt of fastening of a distributive gear wheel. To prevent the crankshaft from turning, engage a gear (if the work is carried out with the engine standing on the vehicle) or lock the flywheel by inserting a screwdriver into its ring gear (if work is carried out on an engine removed from the vehicle).
6. Remove the toothed belt (see relevant chapter).
7. Remove the toothed belt gear from the crankshaft. To press the gear on the shaft, insert two screwdrivers under the gear flange.
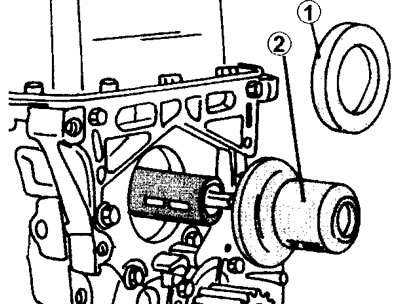
8. Lubricate the working surface of the new oil seal, as well as that part of it that is adjacent to the thrust washer, with engine oil. Pressing in the stuffing box is usually carried out using a special mandrel, the shape of which ensures correct installation (see illustration).

12.7 Press in the front oil seal 1 of the crankshaft using a special mandrel 2
Make sure the crankshaft key is in place before installing the oil seal.
9. Install the thrust washer on the crankshaft and install the timing gear. Make sure that the key does not come out of the groove.
10. Tighten the timing gear bolt to the correct torque. When tightening the gear bolt, the crankshaft must also be secured against turning (by engaging a gear or inserting a screwdriver into the ring gear, depending on whether the engine has been dismantled or is standing on the vehicle).
11. Install the toothed belt in place, tension it correctly and adjust the gas distribution.
Flywheel
If the flywheel ring gear is damaged, the starter gear must also be checked, because they wear at the same time.
The flywheel bolts are offset so that the flywheel can only fit in one position. When installing the flywheel, apply protective grease to the threads of the flywheel mounting bolts «Loctite». Always replace old bolts with new ones. Tighten the bolts evenly in a criss-cross pattern to the prescribed torque. When tightening the bolts, keep the flywheel from turning. To do this, you can fix the metal plate with the clutch bolts, and then turn the flywheel so that the plate rests on the floor. To be on the safe side, have an assistant hold the flywheel and tighten the bolts.
