Note. There are a variety of interior trim panel layouts depending on the model year, vehicle type and sliding side door. The following information serves as a general guide for the most common cases.
Interior door trim panel
1. Contact paragraph 11.
A-pillar trim panel
Removing
2. Remove the seal from the front door opening near the body pillar.
3. Starting at the top, gently pull the trim away from the post to release the inner locking tabs.
4. Lift the trim panel to disengage it from the side of the fascia and remove it from the vehicle.
Installation
5. Installation is carried out in the reverse order of removal. Make sure the fasteners are secure. Install the seal properly.
B-pillar upper trim panel
Removing
6. Open the front door and, if applicable, the sliding side door and remove the seals from the B-pillar.
7. Remove the decorative panel, and then turn out a bolt of the top element of fastening of a seat belt.
8. Turn out the screw of fastening of the bottom edge of the top panel of furnish to a rack of a door.
9. Pull the top panel away from the pillar to release the clips, unhook it from the bottom panel and remove it from the vehicle.
Installation
10. Installation is carried out in the reverse order of removal. Tighten the seat belt anchor bolt to the specified torque.
B-pillar lower trim panel (models with sliding side door)
Removing
11. Remove the top panel of finishing of the central rack as it is described above.
12. Remove a decorative cover and turn out a bolt of the lower element of fastening of a seat belt of a forward seat.
13. Turn out the fastening screw and carefully lift a back edge of the panel of finishing of a forward threshold.
14. Gently push the lower trim panel away from the pillar to release the internal clips, then unhook the seat belt and remove the trim panel.
Installation
15. Installation is carried out in sequence. reverse withdrawal. Tighten the seat belt mounting bolt to the specified torque.
Side trim panel (models without sliding side door)
Removing
16. Remove the top panel of finishing of the central rack as it is described above.
17. Turn out four screws and remove the bottom section of the panel.
18. Using a small screwdriver, carefully pry out the outside of the handrail. Turn out two bolts and unhook an internal part of a hand-rail from a body.
19. Turn out other screws and accurately separate the panel of furnish from a body, releasing internal clamps.
Installation
20. Installation is carried out in the reverse order of removal.
Sliding Side Door Top Trim Panel
Removing
21. Remove the four screws securing the panel to the roof above the sliding side door opening.
22. Gently pull on the panel and remove it from the vehicle.
Installation
23. Installation is carried out in the reverse order of removal.
Front Door Sill Trim Panel
Removing
24. Remove the seal from the lower edge of the front door opening.
25. Remove the screw at the back of the panel.
26. Carefully remove the trim panel from the front door sill to release the clips and remove it from the vehicle.
Installation
27. Installation is carried out in the reverse order of removal. Make sure the fasteners are secure. Install the seal properly.
Side panel luggage compartment trim
Removing
28. Remove the seal from the opening of the luggage compartment near the side panel.
29. Remove a decorative cover and turn out a bolt of the lower element of fastening of a seat belt of a back seat.
30. On models with a two-leaf back door turn out bolts and remove an arm of the limiter of opening of a door.
31. Release the seat belt guide trim from the panel and slide the seat belt through the slot in the guide.
32. When removing the right side panel, remove the cover from the jack and tool storage compartment in the center of the panel, and then remove the fixing screws around the periphery of the opening.
33. Turn out all screws of fastening and remove all visible clamps on panel perimeter.
34. Gently pull the side panel away from the body to release the internal retainers, and then remove the trim panel.
Installation
35. Installation is carried out in the reverse order of removal. Make sure the fasteners are secure. Install the seal properly.
Liftgate trim panel
Removing
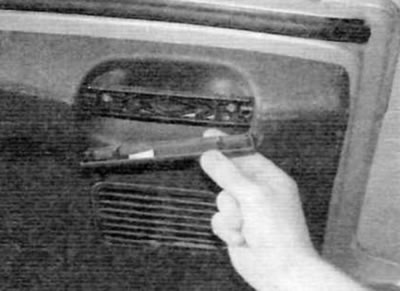
36. Using a small screwdriver, carefully remove the cover (-And) from the handrail (-to her) tailgate (pic. 28.36). Remove the two exposed screws securing the handrail.

Pic. 28.36. Carefully remove the decorative cover (-And) from the handrail (-to her) tailgate
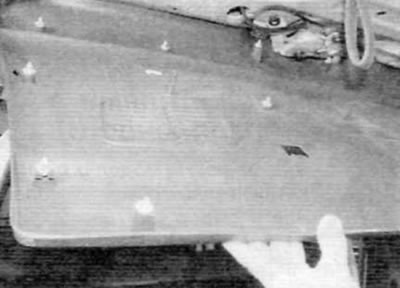
37. Starting at the bottom corner, pull the trim panel sharply away from the tailgate to release the internal latches (pic. 28.37). After releasing all the latches, remove the panel.

Pic. 28.37. Pull the trim panel sharply away from the tailgate to release the internal latches
Installation
38. Installation is carried out in the reverse order of removal. Make sure the fasteners are secure.
Ceiling lining
Note. Removing the headlining without damaging it requires a high level of skill and experience. Therefore, it is recommended that this procedure be carried out by a Peugeot/Citroen dealer or a bodybuilder. The following is a general overview of the procedure for amateur mechanics with sufficient practice to do body work themselves.
39. The headlining is fastened to the roof with clips and additionally glued and can only be removed after removing all other elements, such as handrails, sun visors, sunroof (in the presence of), pillar trim panels and other optional panels. You should also take aside the seals for the openings of the side doors, the tailgate and the sunroof, unscrew all additional screws and remove the remaining clips. After releasing the fixing elements of the headlining, using a technical hot air gun and a spatula, open the adhesive seam on the central panels, starting from the front and moving back.
40. When installing on the center panels, neoprene adhesive should be applied to the places marked during removal (available from Peugeot/Citroen dealers). Carefully expose the headlining and install all elements disturbed during removal. Finally, clean the headlining with soap and water or mineral spirits.
