2. Visually inspect the dustproof covers of the spherical joints of the steering rods and the covers of the steering gear for cracks, cuts and chafing. Any wear on these components results in loss of lubrication, infiltration of dirt and water, and rapid wear of the ball joints or steering gear as a result.
3. On vehicles with power steering, check the power steering hoses for chafing and other damage, and the piping and hose fittings for leaks. Also check for leaks of pressurized fluid through the steering gear boots, which is a sign of failed steering gear seals.
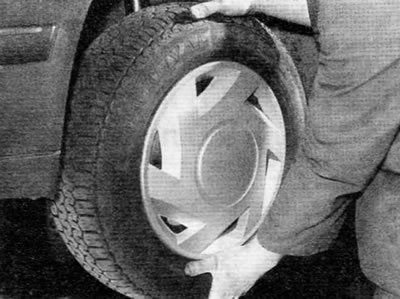
4. Grasp the wheel from above (pregnant «12 hours») and from below («6 hours») and try to shake it (pic. 18.4). A very slight play is acceptable, but if movement is noticeable, further investigation is needed to determine the cause. Continue to rock the wheel, and ask an assistant to depress the brake pedal. If now there is no large play or has largely decreased, the hub bearings are probably faulty. If significant play remains with the brake pedal depressed, then the hinges or suspension mounts are worn out.

Pic. 18.4. To check the wheel bearings for wear, grasp the wheel from above and below and try to shake it
5. Now grab the wheel on the sides («9 o'clock» And «3 hours») and try to shake it again. Any play now perceived can also be caused by worn hub bearings or tie rod ball joints. If the inner or outer ball joint is worn, movement will be visible visually.
6. Use a large screwdriver or pry bar to check for wear on the suspension bushings. To do this, use an impromptu lever to pry the corresponding suspension element relative to its attachment point. Some movement is acceptable as the bushings are made of rubber. Any increased wear will be apparent. Also check the condition of any visible rubber bushings, looking for cuts, cracks or dirt.
7. Put the car on wheels and ask the assistant to turn the steering wheel back and forth approximately 45 degrees in each direction. Steering wheel play should be very small or non-existent. If this is not the case, carefully inspect the hinges and supports described above. Also, check for wear on the steering column universal joints and steering gear.
Suspension struts/shock absorbers
8. Check for leaks near the suspension struts/shock housings or from under the piston rod rubber boot. If there are traces of any liquid, the suspension strut or shock absorber has an internal defect and needs to be replaced.
Note. Suspension struts/shock absorbers of the same axle should always be replaced in pairs.
9. The effectiveness of the suspension strut/shock absorber can be checked by applying pressure to each corner of the vehicle. Usually the body after pressing it returns to its normal position and stops. If, after pressing it, it rises and returns back, it is likely that the suspension strut / shock absorber is defective. Inspect the upper and lower suspension strut/shock mounts for signs of wear.
