2. Remove the battery, battery shelf, and base plate as described in chapter 5A. Depending on the model and working space, to facilitate access to the wiring on top of the transmission, remove the air filter and the remaining elements of the intake air line, as described in the appropriate part chapter 4.
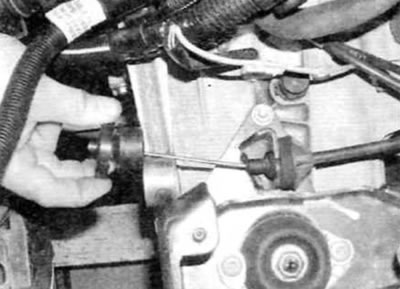
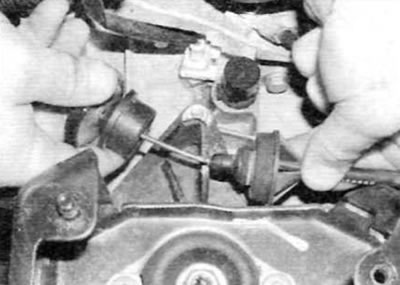
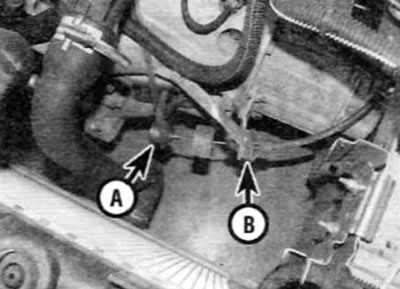
3. In the engine compartment, release the end of the cable from the fork / release lever, and then press the locking elements and release the end of the cable sheath from the bracket on the gearbox (pic. 2.3, a-c).

Fig.2.3.a. On gearboxes MA5 and VEZ / 5, release the tip of the clutch cable from the fork / release lever...

Pic. 2.3, b....then press the locking elements and release the cable sheath from the support bracket on the gearbox

Pic. 2.3, c. On BE4/5 gearboxes, release the tip of the cable (A) from the release fork and the cable sheath (IN) from the support bracket
4. Inside the vehicle, remove the fuse box cover and lower section of the front panel on the driver's side. Keep in mind that access to the clutch pedal inside the car is still very limited, and it is recommended that you first remove the front panel, although this is quite laborious.
5. Reach for the retaining clip, release it and disconnect the cable from the top edge of the clutch pedal.
6. Go back to the engine compartment. release the cable guide from the baffle and pull the cable forward, releasing it from its respective clips and guides.
7. Fully apply the parking brake. Raise the front of the vehicle and securely jack stands under it (see «Lifting and placing the car on supports»). If applicable, remove the engine protection.
8. Release the cable from the clips on the subframe and remove it from the car, noting for yourself how it is routed.
9. Inspect the cable for worn lugs or sheath damage, and signs of inner cable fraying. Check cable operation; the cable must move in the sheath evenly and without jamming. Be aware that a cable that appears to be serviceable when tested outside of the vehicle may bind when in the running position. Replace cable if it shows signs of excessive wear or damage.
Installation
10. Apply a small amount of multipurpose grease to the cable lugs, and then thread the cable through the engine compartment bulkhead.
11. Hold the clutch pedal up by placing a suitable tool underneath it.
12. Guide the end of the cable towards the pedal and secure it with the clip.
13. Return to the engine compartment, lubricate the cable guide and place it in its original position on the bulkhead.
14. Route the cable properly, secure the cable to the subframe and engine compartment clamps, and then route the cable over the top of the transmission.
15. Connect cable sheath to transmission bracket and connect inner cable to fork/clutch release lever. Make sure that the cable spacers and washers are properly positioned on the arm/support bracket.
16. Depress the clutch pedal two or three times so that the cable is in a stable position and the automatic adjuster is activated.
17. Install the battery base plate, battery shelf and battery (see chapter 5A).
18. Install the air filter and air intake piping as described in the relevant part of Chapter 4.
19. Install the fuse box cover and lower bezel trim section. If applicable, install motor protection. Lower the car.
